- Index
- Brand
- Air Lift (20)
- Auto-vox (59)
- Cherocar (40)
- Chevrolet (23)
- Fairchild Industries (34)
- Jecar (24)
- K & N (136)
- Kktrim (19)
- Matala (29)
- Oredy (104)
- Powerstop (42)
- Psi Auto Restyling (154)
- Quietride Solutions (66)
- Rain Bird (106)
- Rugged Ridge (33)
- Savadicar (22)
- Shc Pro Wire (34)
- Shenkenuo (79)
- Supreme Suspensions (37)
- Surecall (28)
- ... (2850)
- Fitment Type
- Product Type
- Shape
- Type
- Aerator Pump (20)
- Bumper (18)
- Bumper Protector (26)
- Carbon Fiber (13)
- Center Console (13)
- Dash Panel (21)
- Exhaust System Kit (12)
- Fender Flares (159)
- Grille (29)
- Headlight Kit (96)
- Interior Carpet (18)
- Interior Trim Set (27)
- Light Bar (14)
- Radiator Fan Kit (13)
- Rear View Camera Kit (15)
- Spoiler (14)
- Sprinkler Controller (16)
- Sprinkler System (26)
- Sticker (13)
- Upper Center (24)
- ... (3352)
- Wattage
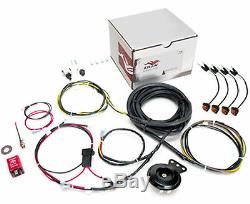
Universal ATV UTV TURN SIGNAL KIT with Horn & Wire Harness Easy Install Made USA


Universal ATV/UTV Signal Kit DUX Signal Kits are the fast and easy way to make your UTV street legal. Each kit includes the signal lights, a pre-wired harness and all the hardware you need. In no time at all youll have the safety and style of factory-installed signal lights.
4xLED Mini Lights with Bullet Ends. 1xHorn Pushbutton Switch with Rubber Boot. 1xToggle Switch w/ Rubber Boot & Stainless Washer. 2xLead Wires for Indicator Light. 4xSpade Terminals for Horn and Horn Switch. 8xFemale Bullet Terminals for the Mini Lights. 2xButt Connectors with Shrink Ends. This is a universal kit that will fit most UTVs. A Polaris Ranger® was used to design this kit. Specific signal placement and wiring routes may vary. Thread the wiring harness through the chassis starting from the front and following the factory harness if you can.It may be necessary to remove the seat and loosen some body panels to ease installation. Be careful to avoid the steering linkage, shift linkage, driveline parts and the exhaust system. Once the harness is in position, secure it with electrical tape or wire ties. Mounting the Horn, Flasher, Turn Switch and Horn Switch.
Find a suitable location for the horn, the flasher, the turn signal toggle switch, and the horn switch. Where they will be protected from splashing water and mud. Drill 15/32 holes for the toggle switch and horn switch. Use the stainless steel washer on the toggle switch when mounting in plastic.
The red wire goes to the center lug on the toggle switch and the green and yellow wires on either side. Check that the red horn wire will reach the horn. Strip the end of the wire and crimp a female spade terminal to it and connect it to the horn.
The white wire will go to the horn switch. Cut it at the desired length being careful not to cut it too short, and install a female spade. The white wire that is left will connect the other side of the switch to the other spade on the horn, using female spades on each end. The red and brown wires MUST be plugged to the +side of the flasher. The single red wire goes to the "L" side of the flasher.
The "P" spade is for the indicator light. The indicator light should be mounted where it can be easily seen while driving. Drill a 7/16 hole to mount the indicator light. Two 18 long wires are supplied to connect the indicator light. Cut the wires to desired length and strip the ends for crimping with the butt connectors. The red wire will be plugged to the "P" terminal on the flasher and the black wire will need to be grounded. Match the colors correctly when connecting to the indicator light.Finish by shrinking the butt connector ends with a lighter or heat gun. The indicator light will flash anytime the turn signals are on. To mount the Maxxima mini LED lights, you will need to drill a 3/4 inch hole in the body for each light.
A sharp wood boring bit or hole saw will work. After selecting the location and drilling the hole, install the black grommet into the hole, thread the wires through the grommet, then push the light into the grommet. Note: The word "top" on the light lens. The black wire on the light is the positive wire and the white wire is the ground wire. On the wiring harness, the black wire is the ground wire, the green wire is left turn, and the yellow wire is right turn.
Once the lights are in place, cut the green and yellow wires to the needed length, strip the ends, and crimp on the female bullet connectors. Plug these bullet connectors onto the black wires on the lights.
The black ground wire on the wiring harness is extra long on the front and rear. Cut off a piece that is long enough to connect the front lights together and do the same on the rear. Strip the ends and crimp on the female bullet connectors.
Plug these on to the white wires on the lights left to right. Now you need to connect the black ground wire on the wiring harness to the black wire running between the front lights using the blue quick splice. Do the same on the rear. Secure all wires as needed using tape or wire ties. Find a suitable ground for the main ground wire.The 12v+ wire going to the 3-amp fuse holder is the main power wire. The brown wire is for a license plate light, if needed, and will be hot when there is power going to the wiring harness. Test the horn and turn lights for correct operation. If the lights are backwards, reverse the wires at the toggle switch or rotate the switch a half turn.
Note: Always carry a spare 3-amp fuse. Crash, impact, or abuse of the product. Check out our store for all your motorcycle, ATV, UTV, Scooter, Snowmobile, Personal Watercraft accessories. The item "Universal ATV UTV TURN SIGNAL KIT with Horn & Wire Harness Easy Install Made USA" is in sale since Monday, July 30, 2018.
This item is in the category "eBay Motors\Parts & Accessories\ATV, Side-by-Side & UTV Parts & Accessories\Electrical Components". The seller is "tituspowersports2010" and is located in Waynesville, Ohio. This item can be shipped worldwide.
- Manufacturer Part Number: DUX ATV/UTV Universal Kit
- Warranty: Yes
- Country of Manufacture: United States
- Fits: ATV
- Brand: DUX
- Placement on Vehicle: Left

